Mounting a Security Camera on Vinyl Siding Without Drilling
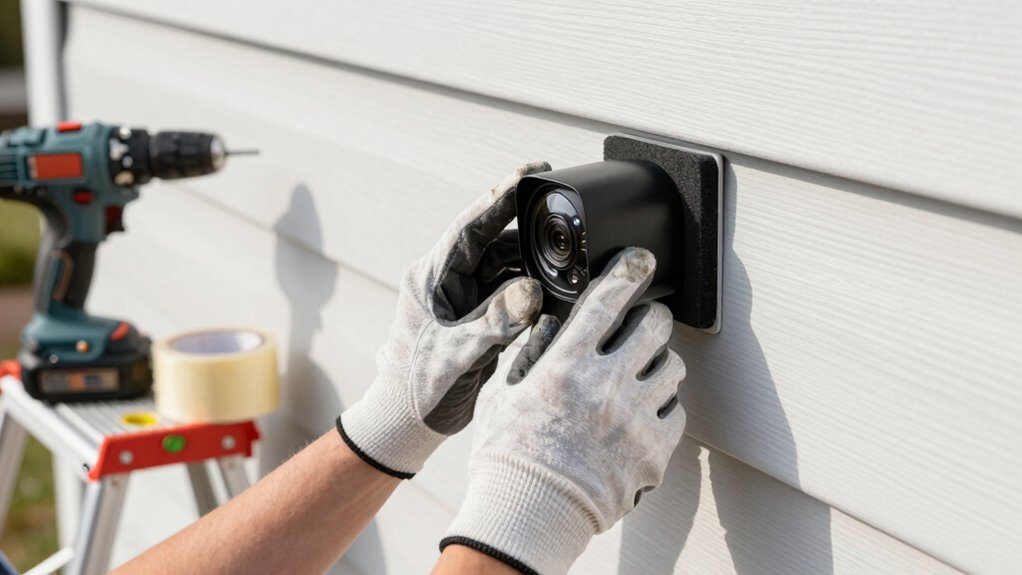
You can securely mount most outdoor cameras to horizontal vinyl-siding seams using purpose-made aluminum siding clips that slip under the upper panel lip and hook beneath the edge; no drilling required.
Slide the clip behind the seam, remove the Phillips screw on the clip, fit your camera plate, then reinsert and snug the screw. Don’t overtighten.
Test for wind resistance and recheck periodically. Below you’ll find compatible clip types, alternative no-drill options, and step-by-step safety tips.
Mounting a Security Camera on Vinyl Siding Without Drilling: You can securely mount most outdoor cameras to horizontal vinyl-siding seams using purpose-made aluminum siding clips that slip under the upper panel lip and hook beneath the edge; no drilling required . Slide the clip behind the seam, remove the Phillips screw on the clip, fit your camera plate, then reinsert and snug the screw.
Quick Overview
- Use aluminum no-drill siding clips that slip under a horizontal vinyl seam and hook beneath the lip for a secure camera mount.
- Slide the clip under the upper panel, curl it beneath the lip, remove the Phillips screw, fit the camera plate, then reinsert and tighten.
- Verify the siding seam profile accepts the clip; the clip and camera base use a 1/4–20 thread; and the clip is outdoor-rated.
- Consider alternatives: adhesive pads, tension mounts, or gutter/soffit hooks that match mount threads and are suitable for heat or textured siding.
- After installation, test wind resistance. Check that the clip sits flat without levering the seam; periodically re-tighten and inspect.
Fast Answer: Use Siding Clips for Vinyl Siding (No Drilling)
Want a quick, no-drill way to mount a security camera on vinyl siding? You can use siding clips that hook under the siding edge and hold the camera mount securely without making holes. These aluminum clips slip behind the lip. You remove a Phillips screw to fit the mount, then reinsert the screw to lock everything in place.
Once the clips are positioned, installing the mount takes five to ten seconds; you’ll finish fast and clean. Clips curl up under the siding’s curled edge to resist high winds and keep the camera stable. This is a practical non-drill method ideal for renters or anyone avoiding permanent changes.
Treat the clips as preferred clipping alternatives when drilling’s not an option: check that the siding edge is intact, align the clip so it won’t pinch wiring, and tighten screws snugly but not overtightened. That keeps the installation safe and reliable.
Which Non‑Drill Mounting Methods Work on Vinyl Siding?
If siding clips aren’t right for your camera or siding layout, several other no-drill options will work on vinyl siding: each with different tradeoffs for strength, weather resistance, and renter-friendliness. You’ll most often choose between adhesive pads, tension mounts, and gutter or soffit hooks.
Adhesive pads stick quickly but lose hold in heat or on textured siding. Tension mounts press between two surfaces and avoid adhesives; yet, they require a stable gap. Gutter/soffit hooks repurpose existing trim but need careful placement to avoid damage.
| Method | Strength | Notes |
|---|---|---|
| Adhesive pad | Low–medium | Fast, can fail in heat; avoid irrelevant discussion of permanent fixes |
| Tension mount | Medium | No adhesive; needs suitable gap |
| Gutter/soffit hook | Medium–high | Uses trim; check clearance and weatherproofing |
Always match mount threads to your camera. Inspect horizontal seam edges and avoid off topic ideas that compromise safety or void leases.
Choose the Right Siding Clip or No‑Drill Mount for Your Camera
How do you pick the right siding clip or no‑drill mount for your camera so it holds securely without damaging the vinyl? Start by confirming the clip is designed for vinyl siding: aluminum clips that attach to the back of the camera mount and use a Phillips screw are standard and reliable. You’ll remove the screw to fit the clip to the mount; then reinsert it to lock the parts together.
Inspect the siding edge where two pieces meet. Look for the slit and the curled lip; the correct clip slides under that curl for a firm hold. Prioritize clips sized to your camera’s base and rated for outdoor exposure to prevent loosening. Note that installation is typically quick—five to ten seconds—but test stability and alignment before finalizing.
Ignore irrelevant topic sales hype or off topic accessories that don’t specify vinyl compatibility. Choose a proven no‑drill kit to minimize damage while keeping your camera secure.
Installing a Siding‑Clip Mount on Vinyl Siding: Step‑by‑Step
Ready to install? Start by locating a horizontal seam where two vinyl siding panels meet; this method only works on vinyl siding with horizontal seams. Wear gloves and eye protection.
Slide the aluminum siding clip under the lower edge of the upper panel until it curls up beneath the lip. Placement should take five to ten seconds. Ensure the clip grips firmly; the curl is what resists high winds.
Remove the Phillips screw from the clip. Align your camera’s mount plate over the clip’s hole, then reinsert and tighten the screw firmly but don’t overtighten; you’re compressing the mount to the clip, not piercing material. Verify the camera’s angle, then snug the screw again.
Check that the clip sits flat and the mount doesn’t lever at the seam. Confirm stability by gently pulling and by testing in moderate wind if possible.
This approach keeps siding intact while providing a secure, no-drill solution using mounting clips on vinyl siding.
Other No‑Drill Options: Adhesive, Clamp, Magnetic, and Gutter Mounts
Wondering which no-drill option will work best for your camera and siding? You’ll evaluate adhesive mounting, clamps, magnets, and gutter hooks by strength, surface needs, and safety. Clean, dry surfaces and manufacturer cure times are mandatory for adhesive mounting.
Clamp mounts need careful torque and rubber pads to avoid slipping; check load limits. Magnetic mounts require truly ferrous, clean metal and aren’t ideal where vibration or debris can shift them. Gutter mounts hook over the lip; verify gutter compatibility and that the gutter can carry the camera’s weight without deforming.
| Option | Quick suitability |
|---|---|
| Adhesive mounting | Best on smooth, non-porous, clean surfaces; follow cure time |
| Clamp | Good for poles/fences; add non-slip padding |
| Magnetic | Use only on solid ferrous metal; test stability |
| Gutter mount | Works if gutter shape & strength match mount |
| Safety note | Recheck mounts regularly; remove at first sign of movement |
Siding Compatibility Checklist: Where Not to Use No‑Drill Mounts
You may have narrowed options down to adhesives, clamps, magnets, or gutter hooks, but for the siding clip mount there are strict limits you must respect. Don’t use this no-drill method on flat walls, wood, fiber cement, composite panels, or vertical siding panels. It’s engineered for horizontal vinyl or aluminum seams only. Check that the seam profile will accept the clip and that the mount plate’s 1/4-20 thread and adapters align with your camera before relying on it.
Avoid treating incompatible surfaces as an unrelated topic; compatibility is safety-critical. Installing on the wrong material risks slippage, siding damage, or camera loss. Also account for privacy concerns: mounting where sightlines invade neighbors’ windows can create legal issues. Because the product is marketed as non-destructive, confirm the surface is actual siding and not a facade covering.
If you’re unsure, inspect seam orientation and material, or opt for a different no-drill option suited to the surface rather than forcing the siding clip.
Troubleshooting and Reinforcing No‑Drill Mounts; Maintenance and Safety Checks
Start by scheduling regular inspections of any no-drill mount. Check the clip curvature under the vinyl seam, look for cracks or metal fatigue, and verify adhesive bonds are intact because these mounts rely on small contact points to resist wind and weight. You’ll perform troubleshooting maintenance steps, document findings, and act quickly if anything shifts.
Check clips and adhesive after heavy weather. Perform wind stress testing by applying steady lateral force to the camera to confirm grip. Clean the area with mild detergent and dry fully before reapplying adhesive or repositioning a clip. If clips or glue fail, move to a different horizontal seam or switch to a gutter/clamp alternative for better load distribution.
Verify camera alignment and tighten any back-mount screws. Record torque and inspect for loosening. Use weatherproof, weight-rated adhesive and accessories specified for your camera model.
Follow a checklist, replace worn parts promptly, and prioritize safety when accessing mounts.
Frequently Asked Questions
Can Siding Clips Void My Home Insurance or Warranty?
Yes, siding clips can affect insurance implications and warranty considerations. You’ll need to check your policy and siding warranty: some insurers or manufacturers restrict attachments that alter or stress siding.
Use approved clips, follow manufacturer instructions, and document installation to reduce claim disputes. If you’re unsure, get written approval from your insurer and siding maker. Prioritize safety and avoid DIY alterations that could be seen as negligent or cause water intrusion.
Can I Use Siding Clips in Extreme Cold or Heat?
Yes, you can use siding clips in extreme temperature, but you’ll need to choose clips rated for extreme temperature ranges and inspect them regularly. Pick UV-stable, corrosion-resistant materials (stainless steel or reinforced plastic) and follow manufacturer temp ratings.
Install snugly without deforming the siding. Check fasteners after heat cycles or freezes and avoid overloading clips. If you see cracks, warping, or looseness, replace clips immediately for safety.
Will Clips Damage Vinyl if Removed Repeatedly?
Yes, repeated removal can cause vinyl wear if you use tight or abrasive siding clips. You should pick clips rated for clip durability and designed for vinyl. Use wide contact pads or protective tape, and loosen clips gently to avoid stressing edges.
Inspect attachment points for cracking or deformation regularly; especially after temperature swings. If you need frequent reconfiguration, consider distributing loads or using mounting plates to minimize localized wear and improve safety.
Can I Paint or Conceal Siding Clips for Aesthetics?
Yes, you can paint or conceal siding clips to match your trim; however, you should choose clips and paints rated for exterior use and flexible adhesion. For design ideas, use removable paintable covers, small trim strips, or faux-wood slats that snap over clips to improve aesthetic options.
Seal edges with UV-safe caulk to prevent moisture intrusion. Additionally, test a small area first so you don’t weaken the clip or void any warranty.
Are No‑Drill Mounts Safe for Battery‑Operated Cameras Only?
Yes, no-drill mounts can be safe for battery-only cameras if you follow no drill concerns and battery-only safety precautions. You’ll choose a mount rated for the camera weight; keep exposure to wind minimal; and secure clips with approved adhesives or siding clamps.
Check seals to prevent moisture ingress. Test attachment strength regularly and replace adhesive pads yearly to avoid failure and protect both camera and siding.
Conclusion
You can mount a security camera on vinyl siding without drilling by using the right siding clip or other no-drill option. However, pick the method that matches your siding profile, camera weight, and exposure. Install clips per instructions and test stability. Reinforce with weatherproof tape or secondary support if needed.
Regularly inspect fasteners, seals, and camera alignment, especially after storms. If in doubt or on older or damaged siding, consult a pro to avoid injury or property damage.
Related reading: Video Doorbell Wedge Mount Angle Guide — a closer look at this topic.