Security Camera Placement Height and Angle Guidelines

Mount most indoor and outdoor cameras 8–10 feet high with a modest downward tilt so faces and upper torsos sit in the recognition zone while reducing tampering. Use wider lenses (≈3.6mm) for near‑field coverage; longer focal lengths are suitable for distant targets. Tilt more in corners and driveways to capture plates and approach angles.
Avoid direct sun or glare. Overlap fields for redundancy and test at expected distances and lighting. Keep going to see setup specifics and tips.
Security Camera Placement Height and Angle Guidelines: Mount most indoor and outdoor cameras 8–10 feet high with a modest downward tilt so faces and upper torsos sit in the recognition zone while reducing tampering. Use wider lenses (≈3.6mm) for near‑field coverage; longer focal lengths are suitable for distant targets.
Quick Overview
- Mount outdoor cameras about 8–10 feet high to deter tampering while capturing usable facial detail.
- Tilt cameras modestly downward so faces and upper torsos fall within the recognition zone.
- Use wider lenses (around 3.6mm) for near-field coverage and longer focal lengths for distant targets.
- Align driveway cameras perpendicular to vehicle travel and tilt 30–45° to reliably capture license plates.
- Overlap fields of view at corners and entrances to reduce blind spots and provide multi-angle ID confirmation.
Quick Camera Placement Rules: Heights, Tilt, and Field of View
How high should you mount outdoor cameras to balance deterrence and identification? You should target a mount height of 8 to 10 feet to deter tampering while keeping broad coverage. When subjects are closer, lower the camera so facial features remain within resolving power. As distance decreases, reduce mount height accordingly to preserve clear facial views.
Use tilt angles downward in corners and along corridors to maximize pathway coverage and eliminate blind spots. Adjust vertical angle so the subject’s face occupies a sufficient pixel area. Balance field of view with distance: choose wider lenses (around 3.6mm) for near-field coverage and switch to longer focal lengths for distant targets to retain detail.
Place cameras high enough to reduce tampering risk but not so high that identification suffers. Calibrate mount height and tilt angles together. Test actual footage at expected distances and tweak angle, height, and lens choice until identification and deterrence are both satisfactory.
Front/Back Door Camera Heights & Tilt for Reliable IDs
Why mount at 8–10 feet rather than higher or lower? You get a technical compromise: that height gives broad coverage, resists tampering, and places faces within an optimal recognition zone at typical approach distances. For front door and back door placements, set the camera at 8–10 feet and apply modest downward tilt angles so faces and upper torsos fall into the 2–3 meter recognition range without perspective distortion.
- Mount at 8–10 feet for tamper resistance and clearer facial detail at approach distances.
- Use downward tilt angles tuned to the door’s approach path; lower tilt for close-range entrances.
- Avoid pointing at windows or strong light sources to prevent glare that obscures IDs.
- Overlap fields of view with adjacent cameras so you can confirm IDs from multiple angles.
- Consider privacy considerations: frame only necessary approach areas; avoid capturing private interior spaces or neighboring property.
Calibrate tilt and field of view. Verify recognition performance in real lighting conditions.
Driveways & Garages: Mounting Height to Capture Plates and Faces
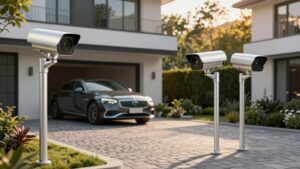
After securing door cameras at 8–10 feet, apply the same height principle to driveway and garage mounts: place cameras roughly 8–10 feet high and tilt them down 30–45° so faces and license plates fall into the camera’s optimal recognition zone while minimizing perspective distortion.
Mounting at this height deters tampering and gives a downward sightline that preserves facial proportions and plate characters. For plate capture, align the camera roughly perpendicular to vehicle travel where plates will face the lens during entry or exit; avoid extreme obliquity that compresses characters. Use IP65+ weatherproof domes near eaves or soffits to shield the lens from glare and precipitation while keeping a broad field of view.
Adjust tilt and pan to cover stopping points and typical vehicle lanes. Validate settings at dawn, midday, dusk, and night with headlights on. Record test clips, inspect plate legibility and facial visibility, then fine-tune driveway angles and zoom to balance plate detail with contextual scene coverage.
Perimeter Corners: Inside‑Corner vs. Corner‑to‑Corner Coverage
Wondering which corner strategy fits your site best? You’ll choose between an inside corner and corner to corner pattern depending on coverage needs, cost, and tamper risk. Inside-corner placement mounts a single camera in a corner, pointing along walls to cover up to 180 degrees using a ~3.6mm lens. It’s compact and cost-effective but can leave edge gaps.
Corner-to-corner uses paired cameras on adjacent corners, providing overlapping 90-degree fields that minimize blind spots and near-complete perimeter visibility.
- Use inside corner for smaller footprints where device count and cabling are constrained.
- Use corner to corner when you need redundancy and reduced blind zones around vulnerable perimeters.
- Select 3.6mm lenses for inside-corner installs to balance breadth and distortion control.
- Consider tampering exposure: corner-to-corner presents stronger deterrence via overlapping viewpoints.
- Plan additional cameras at external edges if inside-corner gaps could admit intruders.
Make final placement decisions by mapping sightlines, lens choice, and tamper vectors.
Indoor Common Areas & Hallways: Heights That Protect Privacy and Cover Valuables
How high should you mount cameras in hallways and common areas to balance deterrence, coverage, and privacy? Mount at roughly 8–10 feet to deter tampering and provide a broad view of movement. Tilt cameras slightly downward so faces and interactions fall within the field of view without harsh head-on angles that distort features.
Use 3.6mm lenses to achieve a wide yet distortion-controlled scene that preserves identifiable details at typical corridor distances. Arrange adjacent units for overlapping coverage to minimize blind spots while maintaining a privacy balance: never point into private sleeping or dressing areas, bathrooms, or other intimate spaces.
Orient cameras toward entryways, living rooms, and corridors to monitor access and valuables without creating intrusive sightlines. Implement consistent placement and calibration across cameras to support bias avoidance in monitoring and analytics.
Verify framing on-site and adjust tilt, zoom, and mounting height to ensure coverage objectives and privacy constraints are both technically satisfied.
Mounting Under Eaves and Overhead: Pitch, Glare, and Weatherproofing
Why mount under an eave? You’ll protect the camera from direct rain and sun, increasing service life and reducing lens exposure. Mount soffit units so the lens angles away from direct sunlight to minimize pitch glare and image washout while retaining target detail.
Place the camera 8–10 feet high to balance field of view and facial detail at close range. Set pitch so the optical axis avoids sun paths and reflective surfaces that create glare or strong shadows. Use soffit-mounted enclosures to route wiring through existing structure and keep cables concealed.
Verify angle produces a stable, shadow-free scene; adjust to eliminate reflections from nearby walls under the eave. Confirm IP-rated weatherproofing for overhead installations and seal penetrations with proper gaskets and silicone.
Follow these technical practices to maintain consistent image quality and equipment longevity when mounting under eaves and overhead.
Tamper Resistance, Maintenance, and Night‑Lighting Tips
Now that you’ve protected cameras under eaves, focus on making them tamper-resistant and reliable while maintaining usable night images. Mount cameras 8–10 feet high and tilt them downward to deter tampering, preserve facial detail, and maximize scene coverage. Use solid anchors into brick or concrete; avoid unstable surfaces and reachable placements. For vulnerable zones, install PTZ or multi-camera arrays at elevated positions to reduce blind spots while keeping safe distances for ID and license plate capture.
Implement routine maintenance: schedule quarterly inspections for mounts, housings, seals, and lens cleanliness. Verify firmware and network integrity; replace degraded seals or corroded fasteners immediately. Apply tamper resistance measures such as tamper-proof screws, conduit for cabling, and vandal housings.
For night lighting tips, prevent direct glare and backlighting by angling cameras away from strong light sources and windows. Use controlled, shielded IR or low-glare illumination to retain contrast without washout. Test nighttime captures after any lighting change.
Frequently Asked Questions
Can I Mix Different Camera Heights on One Property for Better Coverage?
Yes, you can mix heights to improve coverage. You’ll deploy cameras at varied angles and mix heights to capture both wide-area overview and close-up detail.
Position higher units for broad fields and lower units for facial identification or license plates, ensuring overlap and minimizing blind spots. You’ll account for mounting stability, sightlines, glare, and legal sight restrictions.
Calibrate fields of view and use compatible resolutions for consistent image stitching.
How Does Landscaping Growth Affect Long-Term Camera Angles?
Landscape growth will gradually obstruct fields of view, distort angles, and create blind spots if you don’t adjust cameras. You should monitor growth patterns, schedule seasonal pruning, and reposition mounts to maintain target coverage and calibration.
Factor mature height, branch density, and foliage cycles into initial placement and use adjustable brackets or higher mounts. Regular inspections after storms and seasonal pruning keep imaging consistent and reduce false alerts from moving vegetation.
Are There Legal Limits for Recording Public Sidewalks or Neighbors?
Yes, you must follow legal limits and respect privacy rights. You can generally record public sidewalks, but laws vary by jurisdiction and may restrict audio, targeted surveillance, or continual monitoring of private areas like windows and backyards.
You shouldn’t intentionally capture intimate activities or harass neighbors. Check local statutes, ordinances, and case law; use signage, limit fields of view, avoid audio, and retain footage only as legally required to minimize liability.
What Mounting Options Exist for Renters Without Drilling Holes?
You can use several renters options for no drill mounting. Use adhesive mounts rated for outdoor cameras, magnetic bases on metal surfaces, clamp mounts for railings or window sashes, and weighted shelf or tripod stands.
Tension rods with adjustable mounts fit between floor and ceiling. For balconies, use zip-tie brackets or removable railing clips. Test load ratings and weatherproofing, and position for unobstructed field of view while ensuring stability and cable management.
How Do Thermal or Acoustic Sensors Complement Camera Placement?
Thermal and acoustic sensors complement cameras by adding sensor fusion for robust detection: you’ll catch heat signatures and sound events that cameras miss in low light or occlusion.
You’ll place them to create multi-sensor coverage: thermal for perimeter and blind spots, acoustic for glass-break or directional sound. You’ll fuse outputs to reduce false alarms, prioritize video verification, and tune thresholds per zone so alerts are actionable and response times improve.
Conclusion
You’ll get reliable IDs and plate reads by mounting cameras where they view faces and angles, not just areas. Generally, 7–10 ft for doors, 8–12 ft for driveways, and 9–12 ft for corridors is recommended. Tilt them to place subjects in the center of the field of view. Use eave mounts with slight downward pitch, minimize glare, secure housings against tamper, and plan maintenance and night lighting to preserve image quality and system uptime.
Related: Camera Coverage Planner Calculator Field of View Distance