Weatherproofing Camera Junction Box and Cable Connections
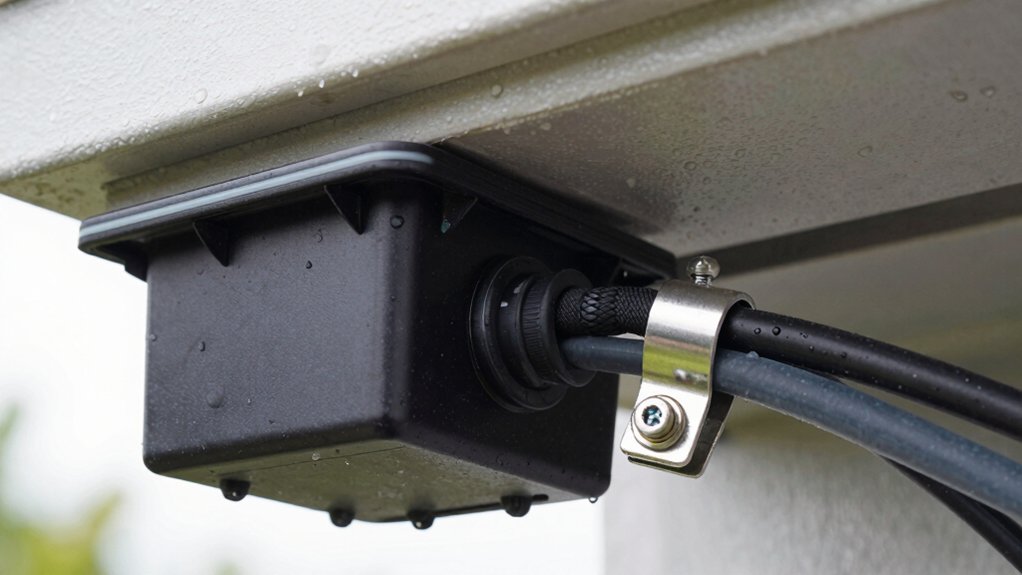
Pick an IP66/NEMA 4X junction box and match grommets to your Ethernet jacket for a snug seal. Feed the cable through a rubber-sealed grommet; seat the small inner plastic seal first. Then nest the larger exterior seal and locking collar to prevent water, dust, and pests.
Route without kinks, tighten caps to spec, secure strain relief, and perform a gentle pull and visual inspection. Keep going and you’ll get step-by-step assembly and testing details.
Weatherproofing Camera Junction Box and Cable Connections: Pick an IP66/NEMA 4X junction box and match grommets to your Ethernet jacket for a snug seal. Feed the cable through a rubber-sealed grommet ; seat the small inner plastic seal first. Then nest the larger exterior seal and locking collar to prevent water, dust, and pests.
Quick Overview
- Use an IP66/NEMA 4X-rated enclosure sized for your connectors and grommeted cable entries.
- Match rubber-sealed grommets to the Ethernet jacket diameter and locking-collar knockout.
- Seat grommets fully; force the inner plastic seal around the cable and tighten caps to spec.
- Nest a smaller inner seal with a larger exterior seal. Inspect for gaps and perform a gentle tug test.
- Route cables without kinks; secure strain relief, document installation, and verify weatherproof pass/fail.
Choose a Weatherproof Junction Box and Grommet Size
Choose a weatherproof junction box rated at least IP66 (or NEMA 4X for coastal/corrosive sites) and match grommets to your Ethernet cable diameter so the seal is snug without compressing conductors. Use rubber-sealed grommets with locking collars; confirm the combined cable-plus-grommet dimensions fit the enclosure’s knock-out and gasket specifications. You’ll follow weatherproofing standards by prioritizing ingress protection and corrosion resistance during enclosure selection.
Pick an enclosure listed for the environment you’re installing in: IP66 minimum for general outdoor use, NEMA 4X where salt or chemicals are present. Measure the cable jacket diameter, then choose a grommet that compresses the jacket enough to seal but not so much it distorts conductors or jacket integrity. Prefer grommets with integrated locking collars and rubber seals to maintain a watertight barrier under vibration and temperature cycles.
Finally, verify manufacturer specs: the knockout size, gasket type, and rated assembly must accept the grommeted cable without voiding the enclosure’s listed protection.
Prepare and Route the Ethernet Cable Through the Grommet
With the correct grommet fitted to your junction box, feed the Ethernet cable through the grommet into the enclosure so the interior stays protected from moisture. Push the large plastic seal on the outside cable portion into the grommet until it seats firmly; that creates the initial weatherproof barrier.
Replace the cap you removed earlier and screw it back in to further seal the box. Inside, align the cable so the connector and any pigtail sit flat; avoid kinks and stress points. Confirm the grommet is fully seated and the cable routing prevents strain on the connector.
Don’t get distracted by irrelevant topic threads or an unrelated concept when checking seals. Focus on fit and alignment.
| Checkpoint | Action |
|---|---|
| Grommet seating | Fully seated, no gaps |
| Seal insertion | Plastic seal forced into grommet |
| Cable routing | Straight, no kinks |
| Cap reinstall | Tightened to spec |
Weatherproof the Cable End Outside the Box
Ready to seal the cable end so moisture never finds its way into the box? Start by feeding the cable through the smaller grommet supplied in its own packaging; that grommet is your first line of defense during weatherproofing cable.
Slide the small plastic seal around the cable next, seating it firmly to create a tight barrier before you add bulk. Run the larger seal up the cable and force it into the smaller grommet; apply steady pressure so the larger piece nests fully and forms a watertight union. If you’re protecting an Ethernet run, consider using the larger piece to cover the cable’s outer sheath for added abrasion and moisture resistance.
Before you route the cable into the junction box, inspect the external seal installation: check for gaps, uneven compression, or exposed sheath. Verify the fit by tugging gently and observing the seal; if anything moves or gaps appear, reseat the seals until you achieve a secure, water-resistant fit.
Assemble and Seat the Grommet Seals and Cap
Want a watertight cable entry? Remove the box cap and pick out the grommet seals and caps. Feed the Ethernet cable through the grommet, position the large plastic exterior seal over the cable, then push that seal firmly into the grommet opening so it nests without gaps.
Use the smaller grommet (still in its packaging if applicable) to seal the outside portion of the cable before you route it into the box. This adds a redundant barrier against moisture.
Once seals are seated, replace the cap you removed and screw it back down evenly; don’t overtighten, but make sure it’s snug. Inspect each seal to confirm it’s flush and hasn’t rolled or twisted.
Give the assembly a light pull test on the cable to verify the seals hold. Keep a note of color coordination, and include budget planning if you need replacement grommets later. These steps lock out moisture at the entry point.
Mount the Access Point and Secure the Cable Inside the Box
How do you fit the access point and rout the cable so everything stays weatherproof and tidy? You screw the two weatherproof pieces together around the access point so the enclosure seals. Then verify the Ethernet connector is fully seated and any strain relief is engaged before final closure. Twist the grommet into place after routing the cable to maintain a tight seal at the entry point.
Attach the little rubber band around the camera’s cable to help tidy routing inside the junction box. Then squeeze all cables neatly inside.
- Seat the access point in the enclosure securely.
- Verify connector seating and strain relief engagement.
- Route cable through grommet, then twist to seal.
- Use the rubber band to tidy and secure cable.
- Click the camera in and tighten the hex screw.
Work methodically: two word idea1 and two word idea2 guide placement and cable management so the box remains weatherproof and organized before final mounting.
Neatly Manage Cables and Fasten the Camera
When you’re ready to finalize the install, tuck and compress the cables neatly into the junction box so nothing’s pinched or under tension. Align the camera, click it into the mounting seat, then insert and tighten the hex screw to lock its position and prevent movement. You will neatly manage cable runs so they enter straight, grommets sit fully, and connectors aren’t strained. Click the camera to engage the mounting holes with the inserts, confirm alignment, then fasten the camera with the hex screw to maintain a stable view.
Check that cables lay flat and don’t press against the housing edge. Use gentle compression to avoid kinks and maintain service loops for future maintenance. The final visual inspection should show neat routing, seated grommets, and a secure camera that resists rotation. This keeps wear low, reduces water pathways, and makes later troubleshooting quick and predictable.
| Task | Action | Verify |
|---|---|---|
| Route | Straight runs | No bends |
| Seat | Grommets | Fully seated |
| Secure | Hex screw | Tight, locked |
| Inspect | Cables | No pinch |
| Final | Camera | Stable, aligned |
Test Seals, Connections, and Final Weatherproofing Checklist
Ready to confirm the install? You’ll perform focused weatherproof testing and a final check of seal integrity to be sure the junction box and cables will withstand rain and movement. Apply gentle pressure to every grommet and cap to feel for gaps; any give means re-seat or replace the seal. Verify the Ethernet end: both smaller and larger plastic seals must be fully seated and should protrude slightly to block moisture.
- Press each seal around grommets and caps for waterproof grip.
- Inspect Ethernet seals for full seating and correct protrusion.
- Run a pull test on the cable inside the box to confirm no strain on connections.
- Ensure the weatherproof cap is screwed to rated torque with no exposed threads.
- Confirm all external access points are sealed; the camera is mounted, and cable routing prevents water ingress.
Finish only after these checks pass. Document issues, retest after fixes, and label the installation date for future inspections.
Frequently Asked Questions
Can I Use Silicone Sealant in Addition to Grommet Seals?
Yes, you can use silicone sealant in addition to grommet seals, but check sealant compatibility and consider silicone alternatives for specific plastics or paints. You’ll want neutral-cure silicone if materials react to acetic types.
Apply a thin, continuous bead around cables and grommet edges, smoothing to avoid gaps. Let full cure time elapse before exposing to moisture. Inspect periodically and replace degraded seals to maintain reliable protection.
How Do I Weatherproof Poe Injector Connections?
Use a weatherproofing enclosure for the injector, mounting it out of direct weather. Fit cable entries with proper electrical seals or grommets; route cables through sealed glands. Secure connections inside with silicone or electrical tape wrapped and then sealed with self-fusing tape.
Elevate the injector and keep power connections off the ground. Ventilate with a waterproof breather if needed, and inspect seals periodically. Reapply sealant where you see wear or moisture ingress.
Are There Temperature Limits for the Junction Box Materials?
Yes, junction box materials have temperature limits you must respect. You’ll check manufacturer specs for minimum and maximum operating temperatures; confirm material compatibility with your environment (UV, chemicals, thermal expansion).
Metals, plastics, and silicones behave differently: plastics can become brittle in cold; metals expand with heat. Match seals and gaskets to those ranges, pick compatible adhesives, and allow ventilation or insulation where extremes exceed rated limits.
Can Rodents or Insects Damage the Sealed Cable Entry?
Yes, rodents and insects can breach a sealed cable entry. You should expect rodent intrusion and small pests to gnaw, tunnel, or exploit seams. This can lead to insulation failure and water ingress.
Use metal conduit, stainless steel glands, insect-tight grommets, and rodent-resistant sealants. Inspect regularly, install physical barriers, and replace compromised seals promptly; this will help you prevent damage and maintain long-term cable integrity.
How Often Should Seals and Grommets Be Inspected?
You should inspect seals and grommets every 3–6 months. Your inspection frequency depends on environment: harsher conditions (UV, salt, pests) push you toward quarterly checks. Milder sites can stretch to semiannual checks.
During each check, test grommet seals for cracking, compression and ingress. Reseal or replace as needed. Log findings to establish a maintenance cadence and adjust how often seals need attention based on wear trends and incident history.
Conclusion
You’ve picked the right box and grommet, routed and sealed the Ethernet, and assembled the grommet and cap so water stays out. Mount the access point; secure and tug-test the cable inside; tidy the internal wiring to prevent strain.
Finally, check every seal, connector, and cable entry for gaps. Then test the camera’s link and power under wet conditions. Reinspect periodically to keep the installation weatherproof and reliable.
Related reading: Running Ethernet Cable — a closer look at this topic.